A timezone that does not match the proxy IP makes your profile look suspicious. A proxy that drops mid-session exposes your real IP to the site. Either one can get your MostLogin profile flagged or banned. This guide covers the MostLogin settings that protect against both, using our static ISP proxies.
TL;DR
Enter your proxy credentials in the Proxy tab, set Language, Timezone, and Coordinates to "Based on proxy IP" in the Fingerprint tab, and enable all 4 "Do not open profile" settings in Preferences.
- Protocol is HTTP. SOCKS5 is not supported by HypeProxies.
- The "Based on proxy IP" setting matches your profile's language, timezone, and coordinates to the proxy IP automatically.
- The 4 "Do not open profile" settings prevent the profile from launching if the proxy fails or changes.
Before you start
You need these 3 things ready:
- MostLogin installed: Sign up at mostlogin.com, download the desktop app for your OS (Windows or macOS), and verify your email.
- HypeProxies account with proxies purchased: A $1 trial is available for evaluating the service.
- Your proxy list:
69.54.248.46:59544:eo******:CB**********
69.54.250.138:58372:eo******:CB**********
69.54.250.14:65040:eo******:CB**********
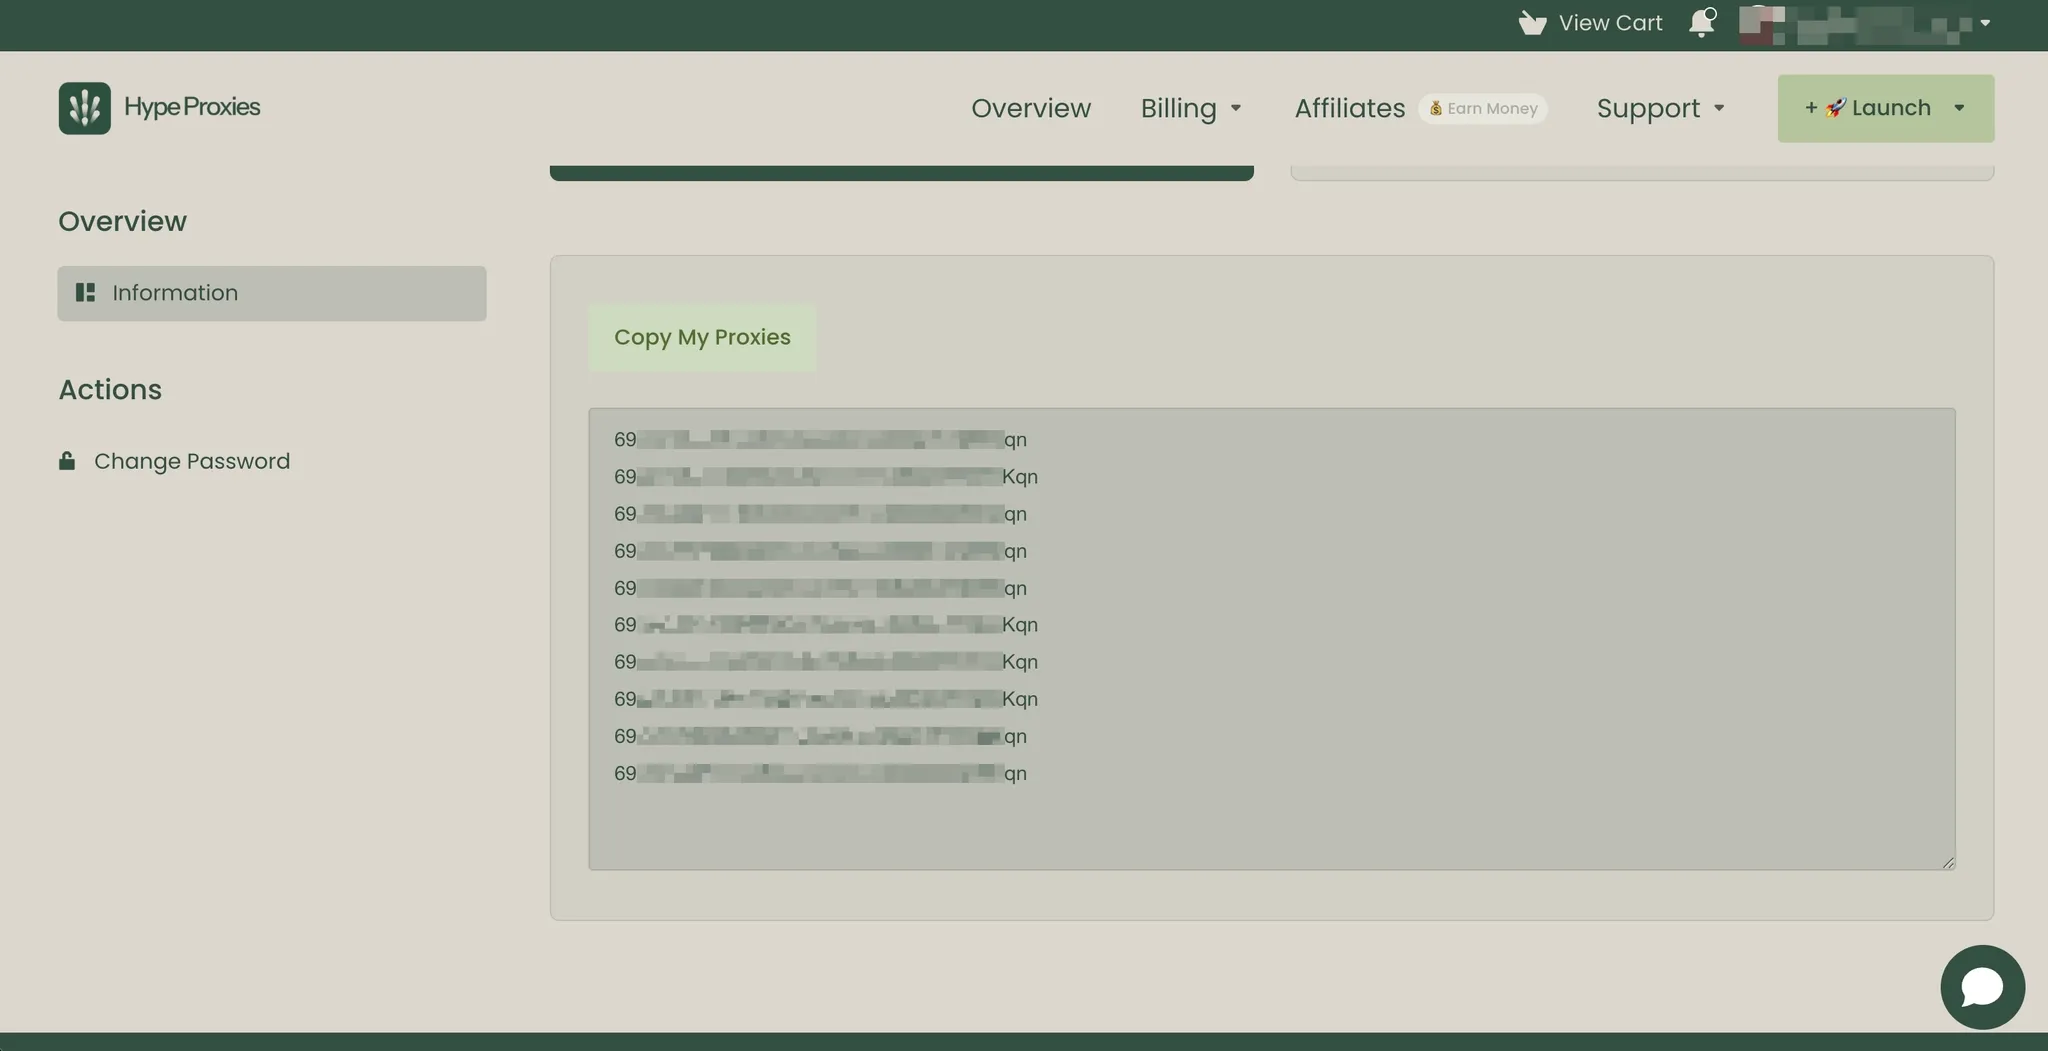
Use the actual proxy list from your own HypeProxies account. You can find it in your HypeProxies dashboard: from the Client Area, open your active service under My Products & Services, then click Information in the left sidebar. Click Copy My Proxies to copy all lines to your clipboard.
If you have all 3, skip to Method 1. Otherwise, read the sections below.
What to know
The proxy IPs are located in the US and Canada only. If you need IPs in Europe or Asia, our proxies will not work for you.
Protocol is HTTP. SOCKS5 is not supported.
Each HypeProxies IP is a dedicated static ISP proxy – one user per IP, and the IP address does not change between sessions.
Our IPs come from direct partnerships with US internet service providers – not resold or rented from middlemen. Databases like IP2Location and MaxMind classify them as ISP-type, which matters because many platforms use IP type as a trust signal when evaluating traffic.
You can check any IP yourself with our free Proxy Checker tool. No account is needed. The tool shows fraud score, reverse DNS, geolocation, and ASN data.
Proxies come in the format IP:Port:Username:Password. This is the same format MostLogin uses, so no conversion is needed.
Pricing
Recommended setup: 1 IP per profile. All plans include unlimited bandwidth.
| Accounts | Plan | IPs | Monthly | Per IP |
|---|---|---|---|---|
| Up to 50 | Pro | 50 | $65 | $1.30 |
| Up to 100 | Business | 100 | $125 | $1.25 |
| Up to 254 | Enterprise | 254 (/24 subnet) | $300 | $1.18 |
Quarterly billing saves 10%. A $1 trial is available, and we accept cryptocurrency payments. Custom plans for more than 254 IPs are available on request.
Pricing may change. See our pricing page for current rates.
Method 1: Add a proxy to a single profile
Screenshots below are from a recent version of MostLogin. If your version looks slightly different, the steps and field names are the same.
Use this method for a single profile. If you have 20 or more IPs to set up, go to Method 2.
Step 1: Create a new profile
Launch MostLogin. The app opens on the Profiles tab by default. Click the "+ Create profile" button.
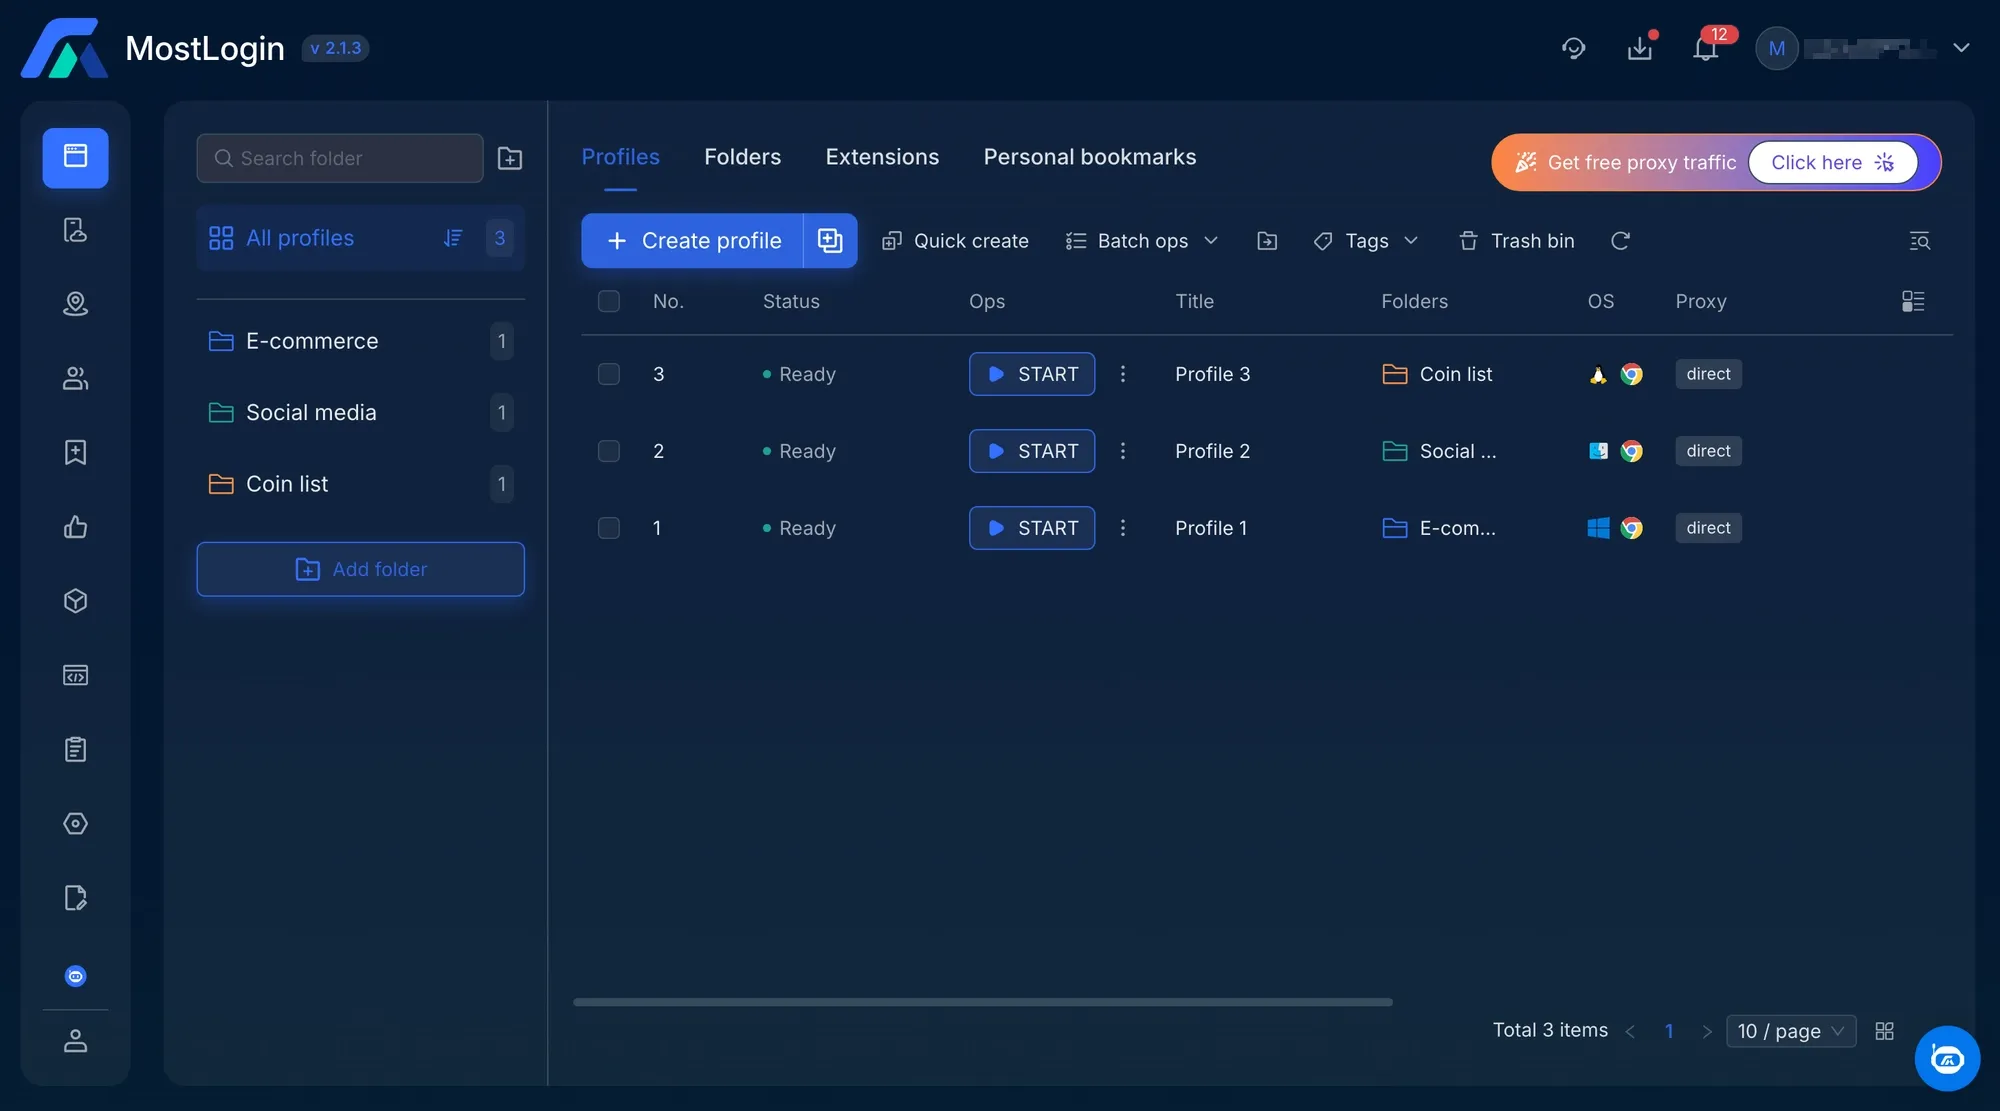
MostLogin Profiles tab dashboard with the Create profile button highlighted in the top left
Step 2: Fill in the General tab
Fill in these 2 fields on the General tab:
- Folder: Pick an existing folder or create a new one to organize your profiles (for example, "E-commerce").
- Title: A name you will recognize when managing dozens of profiles. Example:
HypeProxies-01.
Leave the other settings at their default values. MostLogin automatically generates the OS fingerprint, user agent, browser version, and screen resolution.
Step 3: Switch to the Proxy tab
The profile editor has 5 tabs: General, Proxy, Advanced, Fingerprint, and Preferences. For this setup, we only use Proxy, Fingerprint, and Preferences. You can ignore Advanced for a standard setup.
Click the Proxy tab (the second tab at the top).
You will see 4 options on the Type row:
- Basic: Manual proxy entry. Select this option for HypeProxies proxies.
- API extraction: For rotating proxy providers that use an extraction URL.
- Added proxies: Select from proxies you have already imported (covered in Method 2).
- Proxy hub: MostLogin's built-in proxy marketplace.
Select Basic. Open the Proxy protocol dropdown and choose http.
Note: The proxy you configure here applies only to this profile. Each profile has its own proxy configuration.
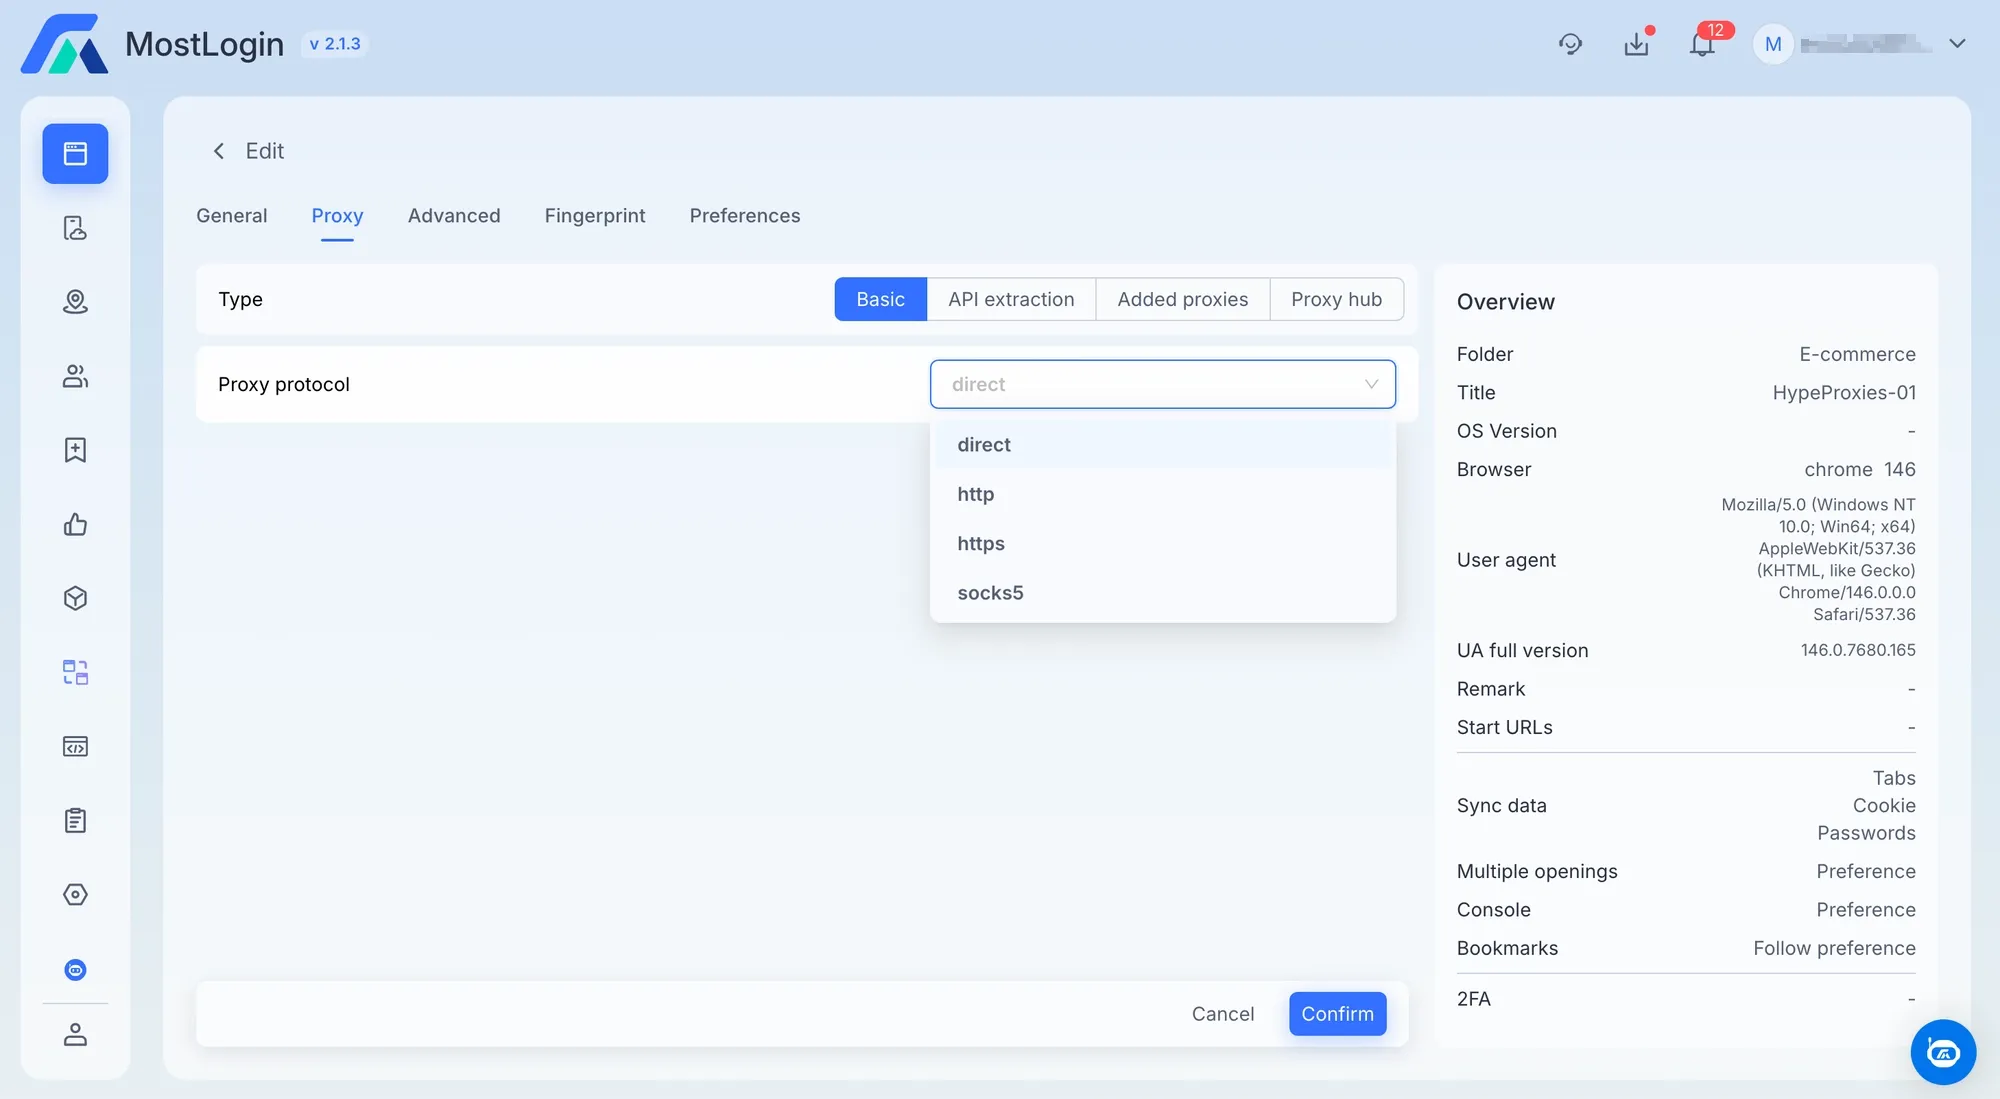
MostLogin Proxy tab with the Proxy protocol dropdown open, showing four options: direct, http, https, and socks5
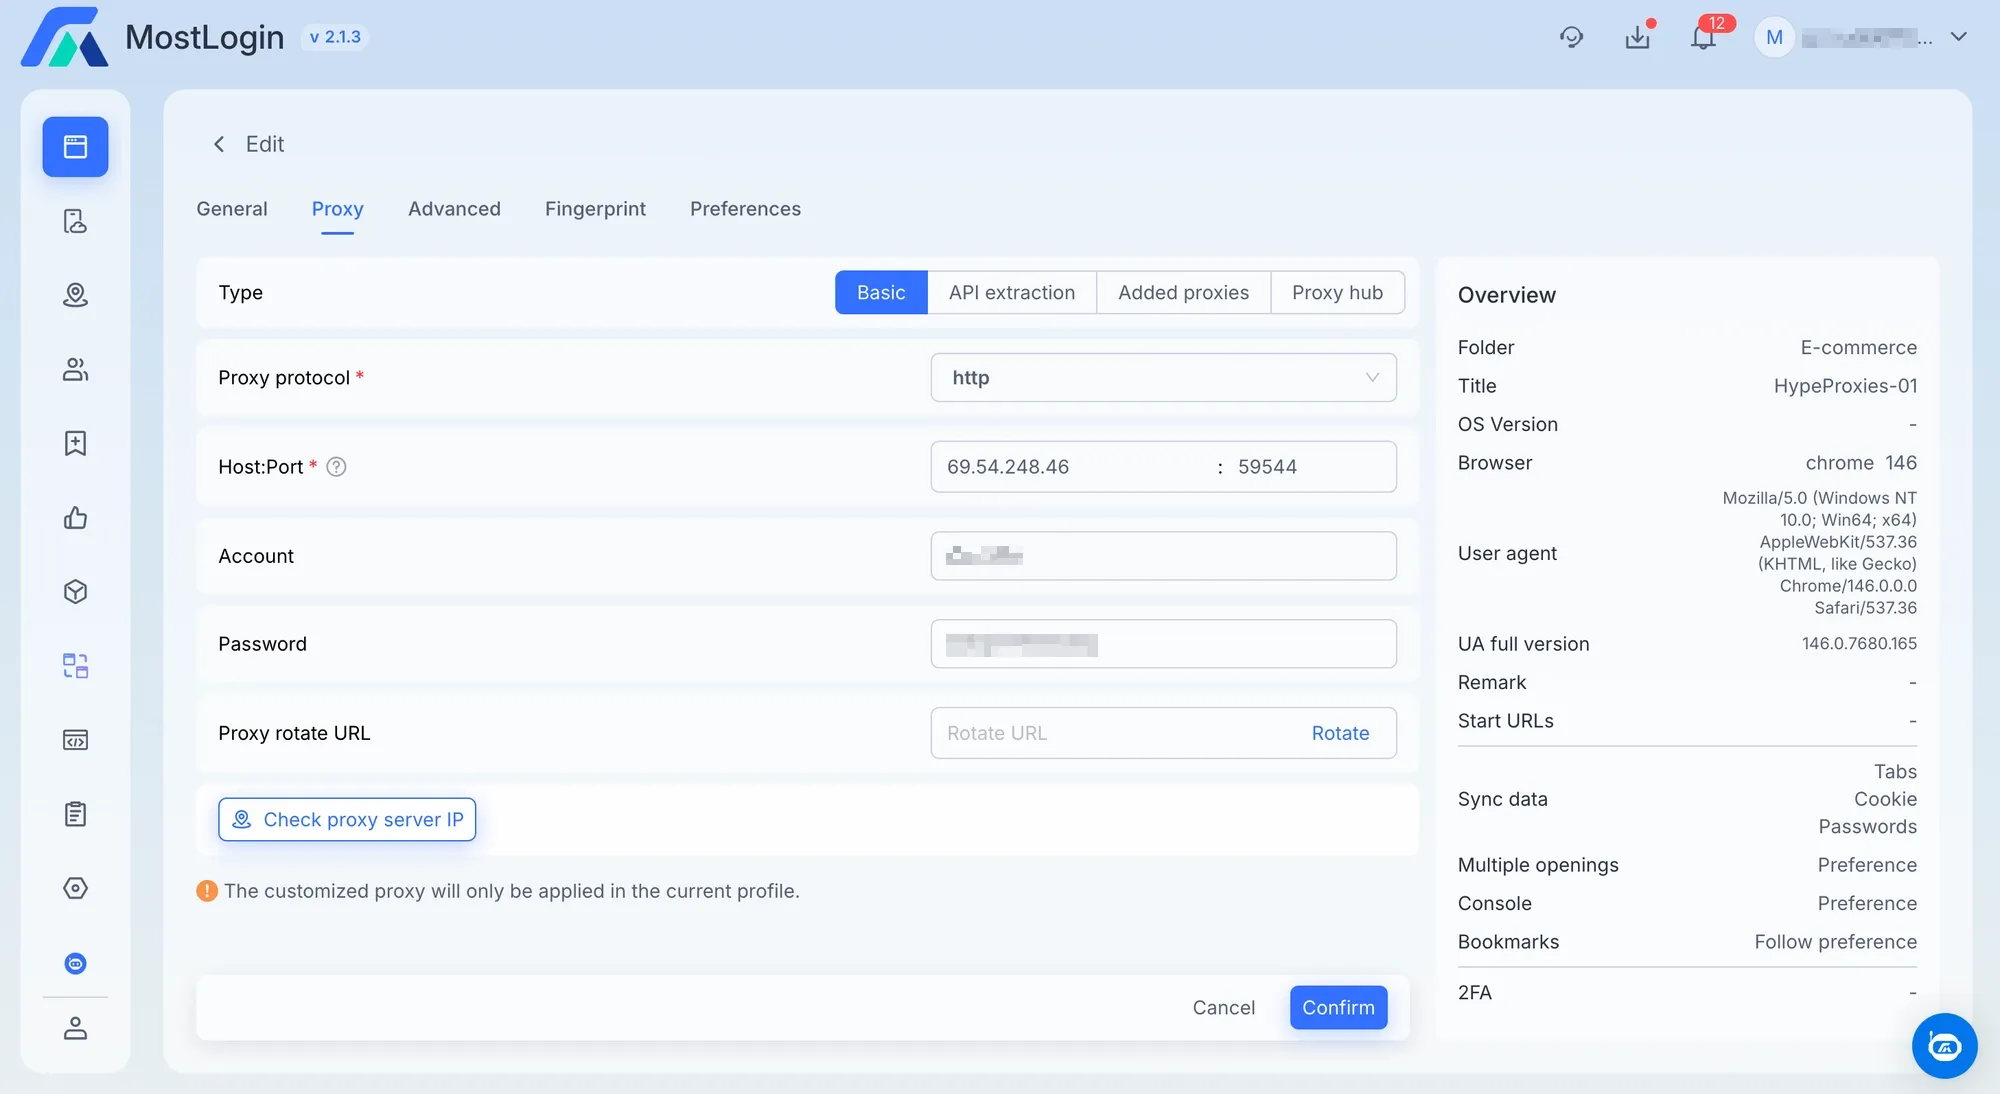
Step 4: Enter your proxy credentials
Take one line from your proxy list:
69.54.248.46:59544:eo******:CB**********
Split it into the fields below. The Host:Port row is a single field with two input boxes separated by a colon – enter the IP address in the left box and the port number in the right box.
| Field | What to enter | Example |
|---|---|---|
| Proxy protocol | http | http |
| Host:Port (left box) | IP address | 69.54.248.46 |
| Host:Port (right box) | Port number | 59544 |
| Account | Username | eo****** |
| Password | Password | CB********** |
Leave the Proxy rotate URL field empty. Our IPs are static, so rotation does not apply.
Step 5: Test the connection
Click the "Check proxy server IP" button at the bottom of the form.
If the proxy connection is successful, a green panel appears showing the IP, location, and timezone. Your location depends on which US state your IP is registered in – it will not necessarily match the New York example below.
If the check fails: first, verify the protocol is set to http. Then copy and paste the IP, port, username, and password again, checking each value against your proxy list. If all credentials are correct, verify the proxy is still active in your HypeProxies dashboard.

Successful proxy connection check in MostLogin showing IP 69.54.248.46, location US New York, and America/New_York timezone
Step 6: Check the Fingerprint tab
The Fingerprint tab is where the profile's language, timezone, and coordinates are set to match the proxy location. Click the Fingerprint tab and check these 3 settings:
- Language → "Based on proxy IP"
- Timezone → "Based on proxy IP"
- Coordinates → "Based on proxy IP"
MostLogin applies these values by default. If your settings show a different value (for example, "Follow system"), change them to "Based on proxy IP." With this setting applied, a New York IP will produce en-US as the language, America/New_York as the timezone, and New York coordinates.
The other fingerprint settings (Canvas, WebGL, WebRTC, etc.) are enabled with secure defaults. You don’t need to change these for a standard setup.
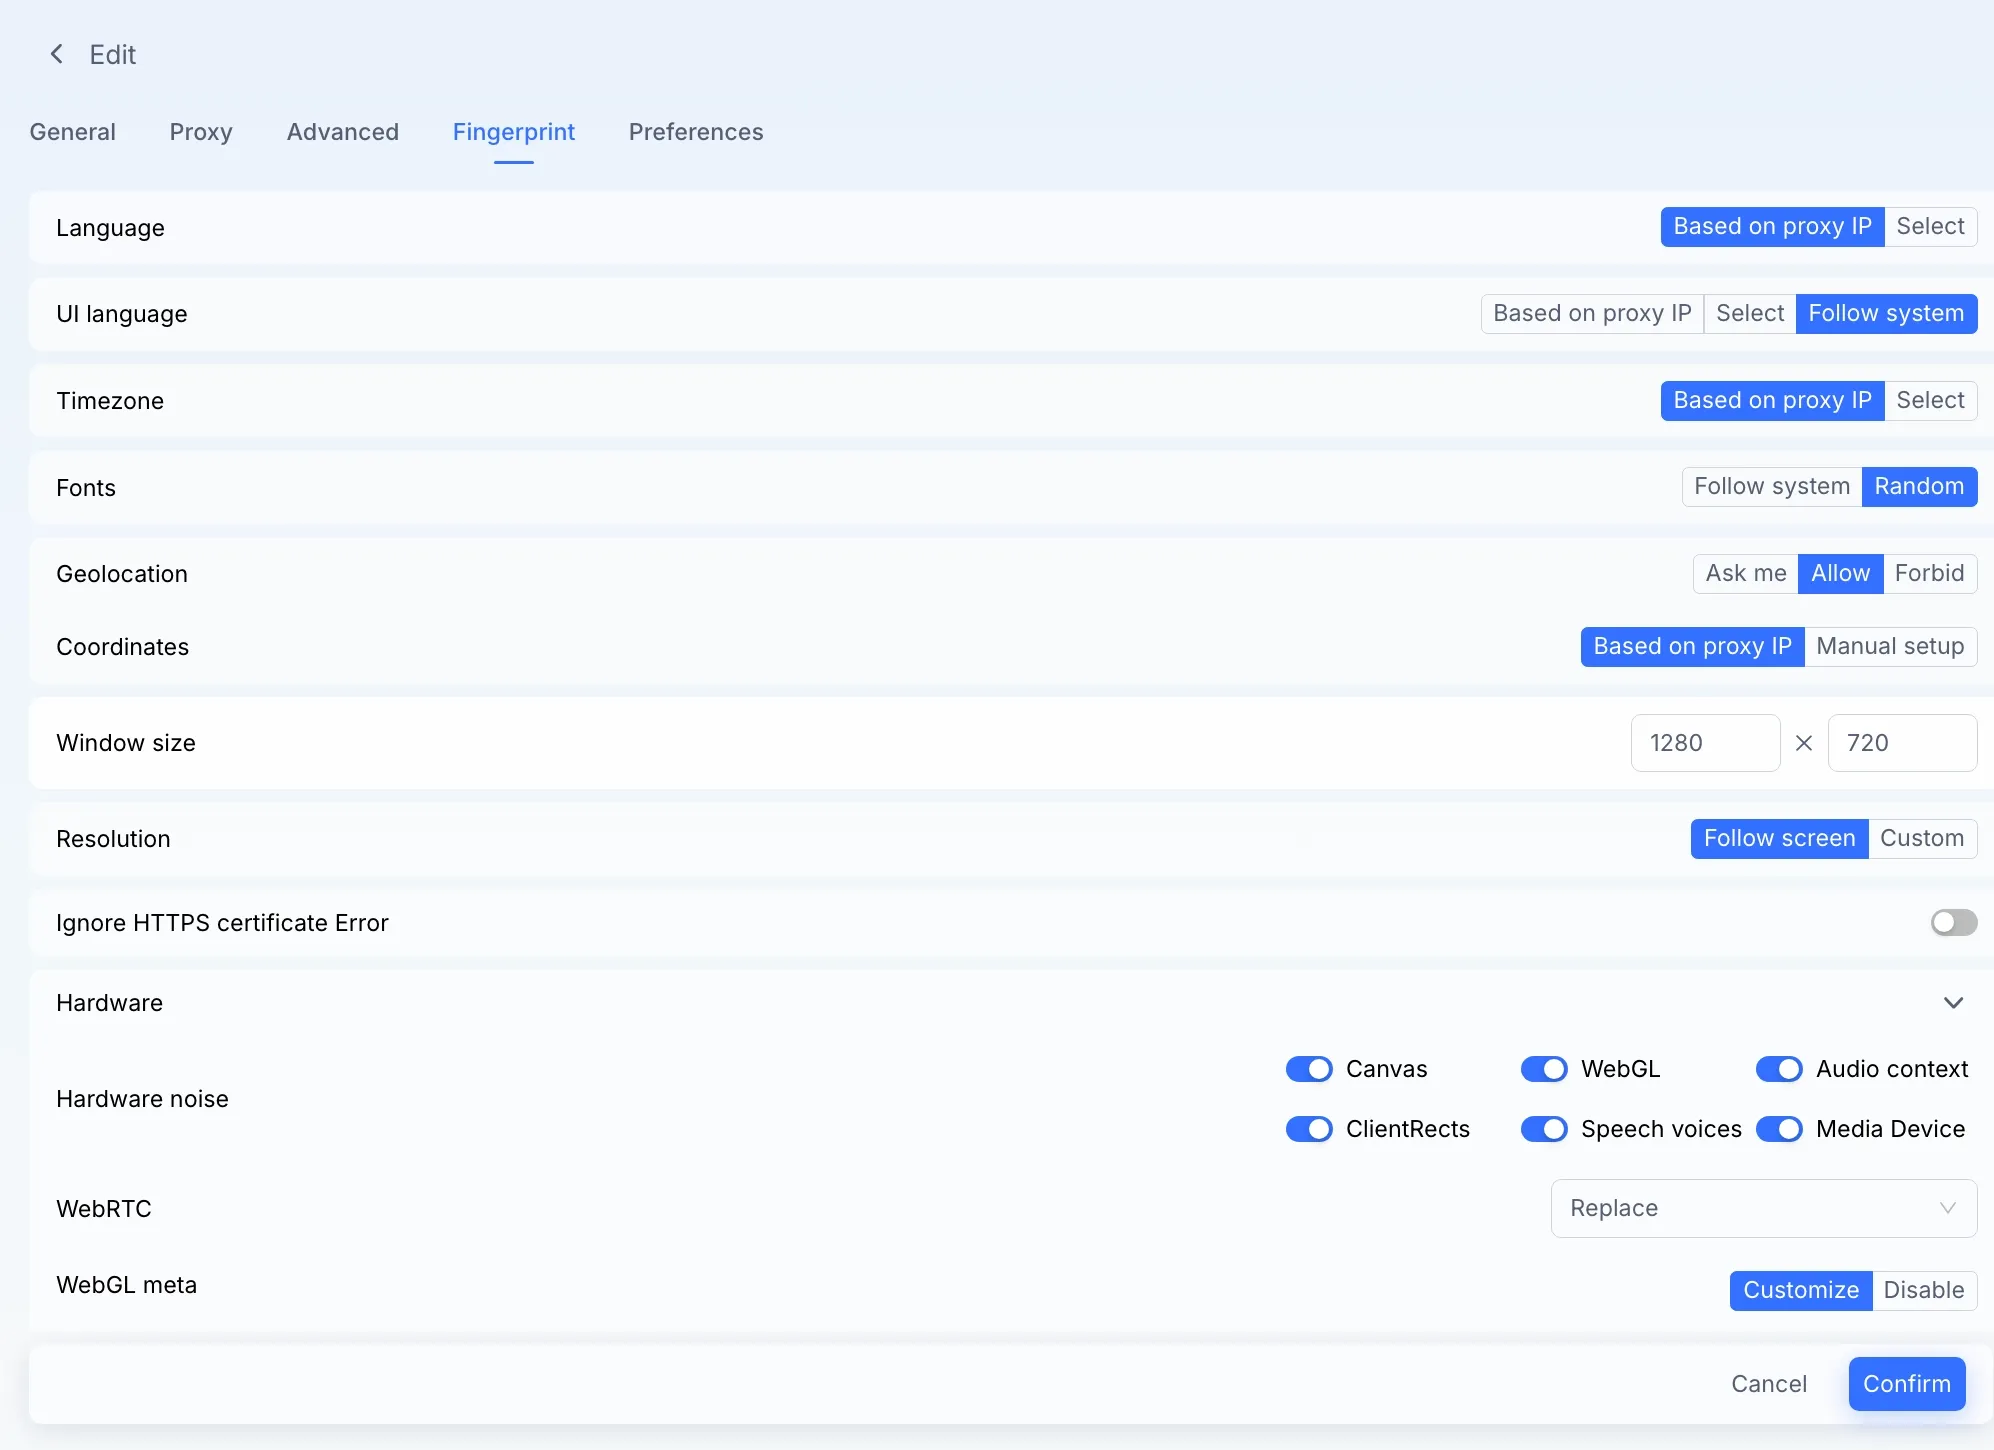
MostLogin Fingerprint tab with Language, Timezone, and Coordinates all set to Based on proxy IP
Step 7: Enable the "Do not open profile" settings
Click the Preferences tab. Scroll to the "Do not open profile" section at the bottom:
| Setting | What it does | Recommendation |
|---|---|---|
| On proxy error (connection failed) | Blocks launch if the proxy is down | Change to Enable |
| Stop opening on proxy IP change | Blocks launch if IP changed since last session | Change to Enable |
| Stop opening on proxy IP country change | Blocks launch if IP country changed | Change to Enable |
| When synchronization fails | Blocks launch if profile data sync fails | Change to Enable |
With dedicated static IPs, these settings will not trigger during normal use. They only activate when there is an actual problem with the proxy. The worst outcome is a profile that fails to launch, which is safer than a profile that launches using your real IP address.
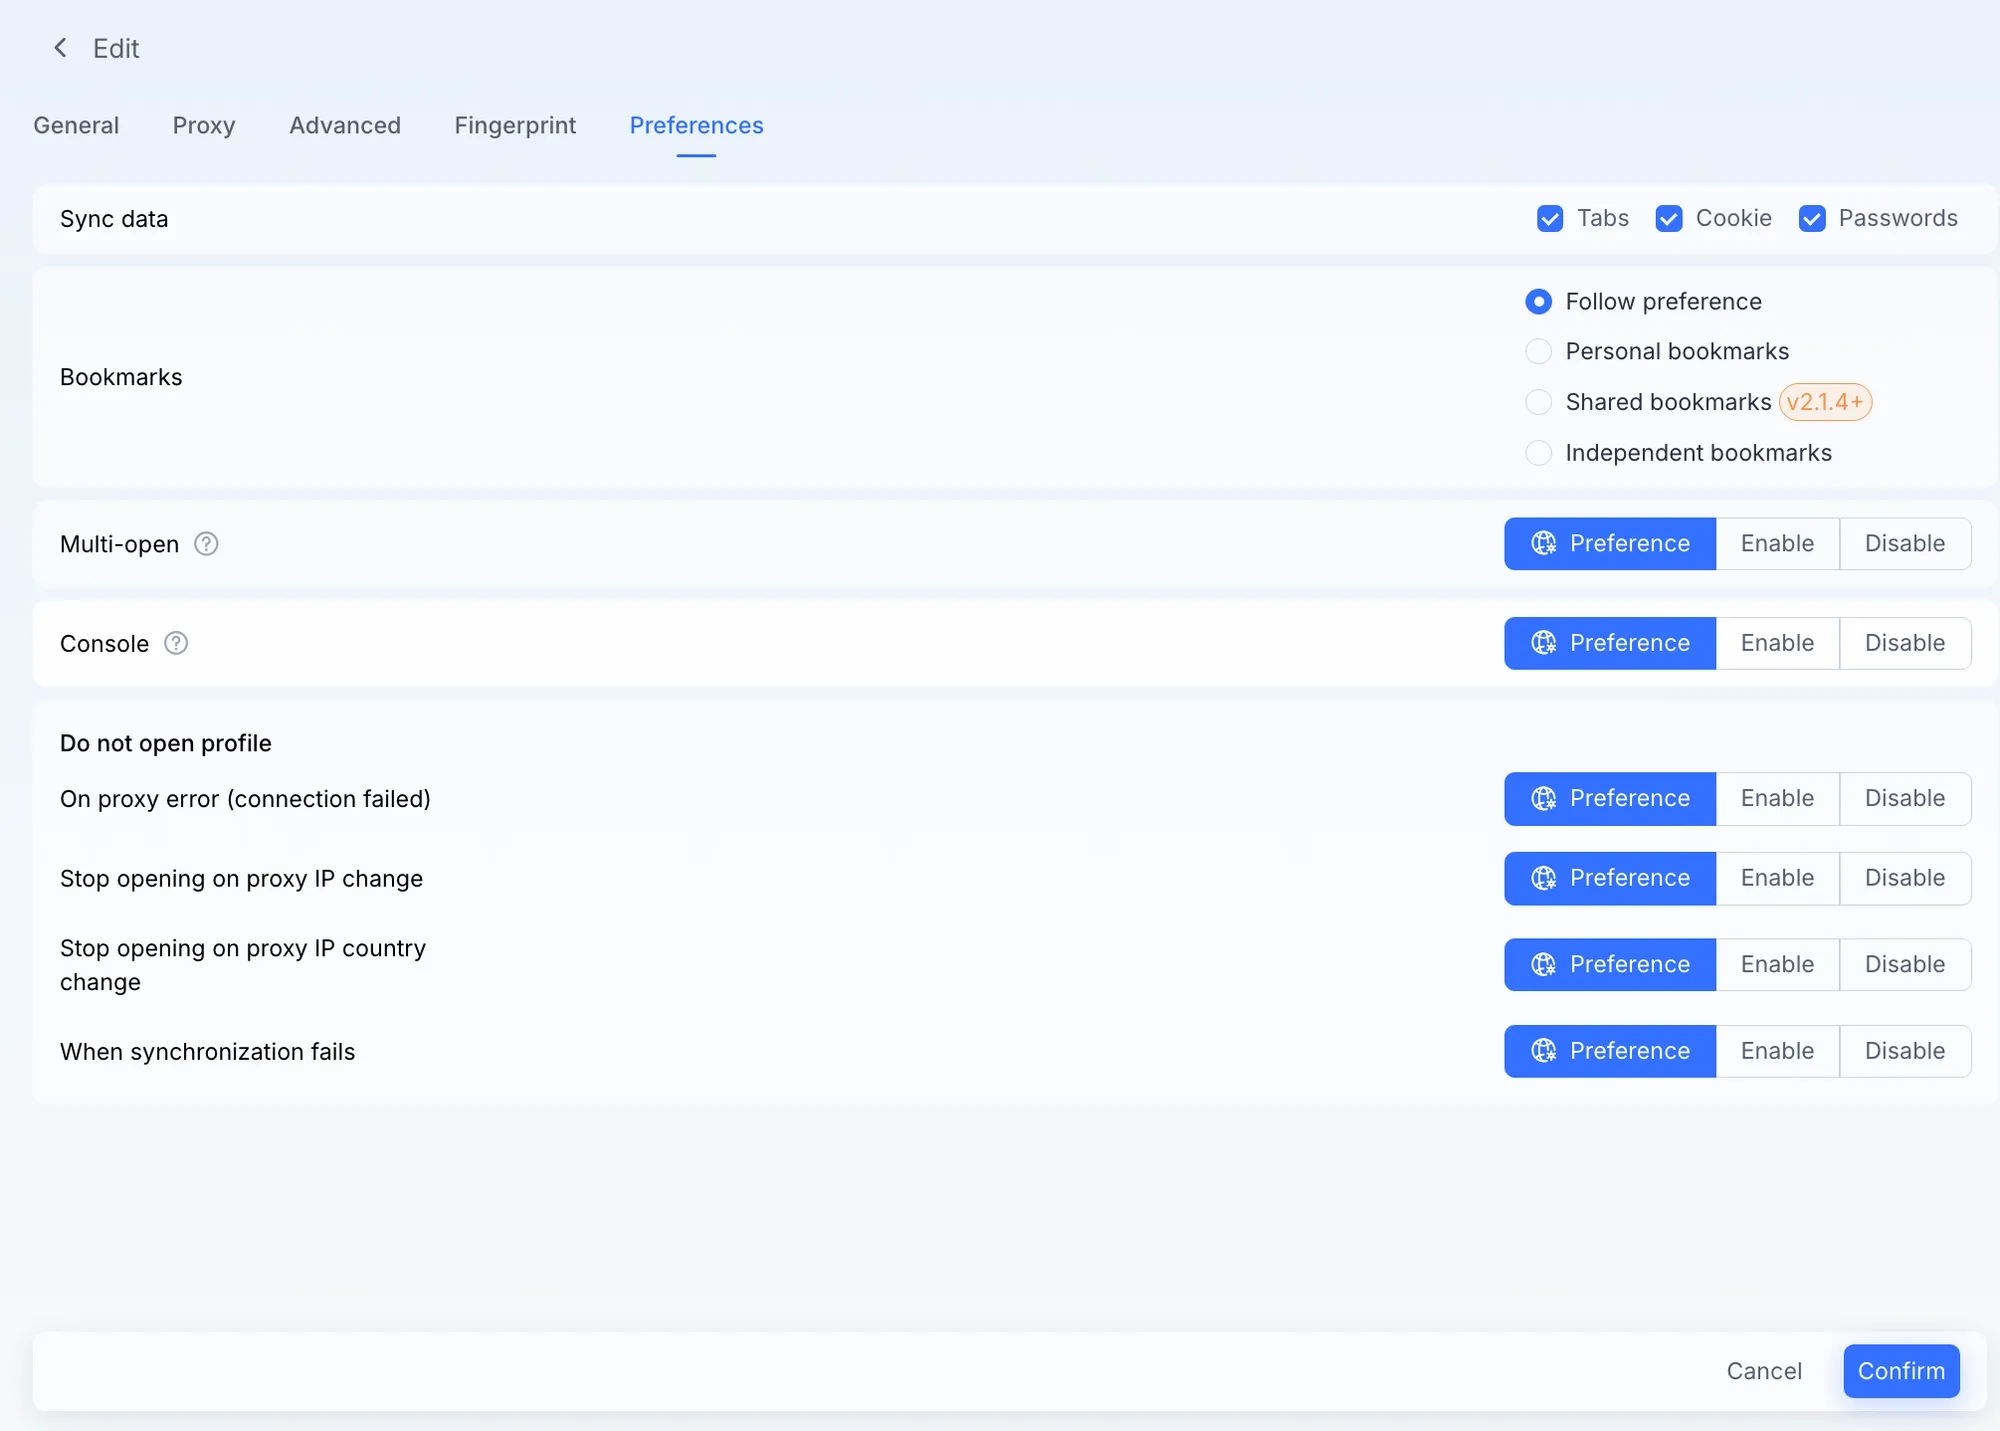
MostLogin Preferences tab showing the four Do not open profile settings: proxy error, IP change, IP country change, and synchronization failure
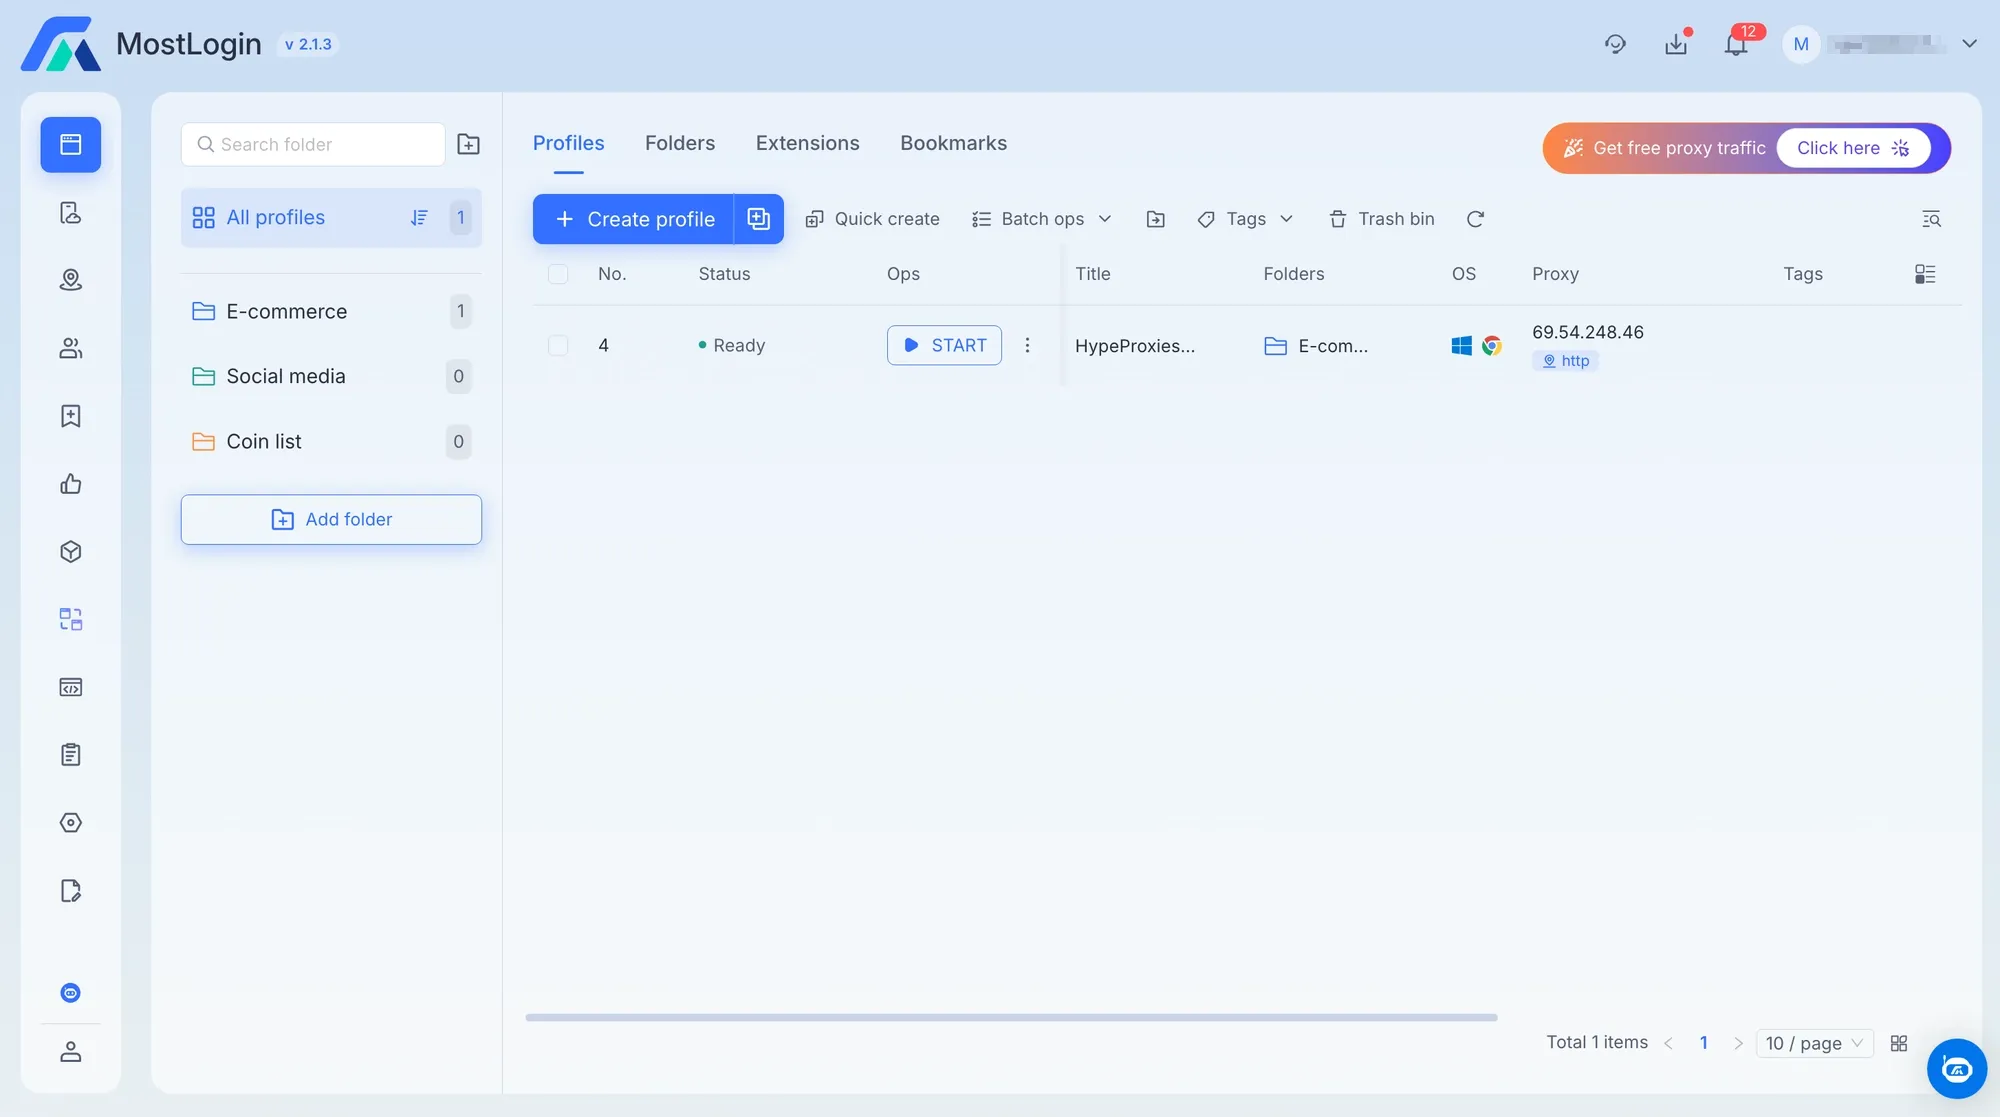
Step 8: Save the profile
Click Confirm. The Profiles dashboard now shows your profile with the proxy IP in the Proxy column, instead of "direct".
MostLogin Profiles dashboard showing the HypeProxies-01 profile with IP 69.54.248.46 and http badge in the Proxy column
Step 9: Launch and verify
Click the green Start button. MostLogin opens a browser window with a start page showing:
- IP – your proxy IP (example:
69.54.248.46) - Location – US / New York(NY) / New York
- Language – en-US
- Timezone – America/New_York
The start page also links to fingerprint detection tools like ToDetect and BrowserLeaks. Run one of these tools and verify that:
- The detected IP matches your proxy IP.
- WebRTC is not leaking your real address.
If WebRTC shows your real IP, go back to the profile's Fingerprint tab and check the WebRTC setting. It should be set to "Replace" mode, which is MostLogin's default. Replace mode substitutes the proxy IP for WebRTC, so no real-IP leak occurs.
This verification confirms your setup is working correctly.
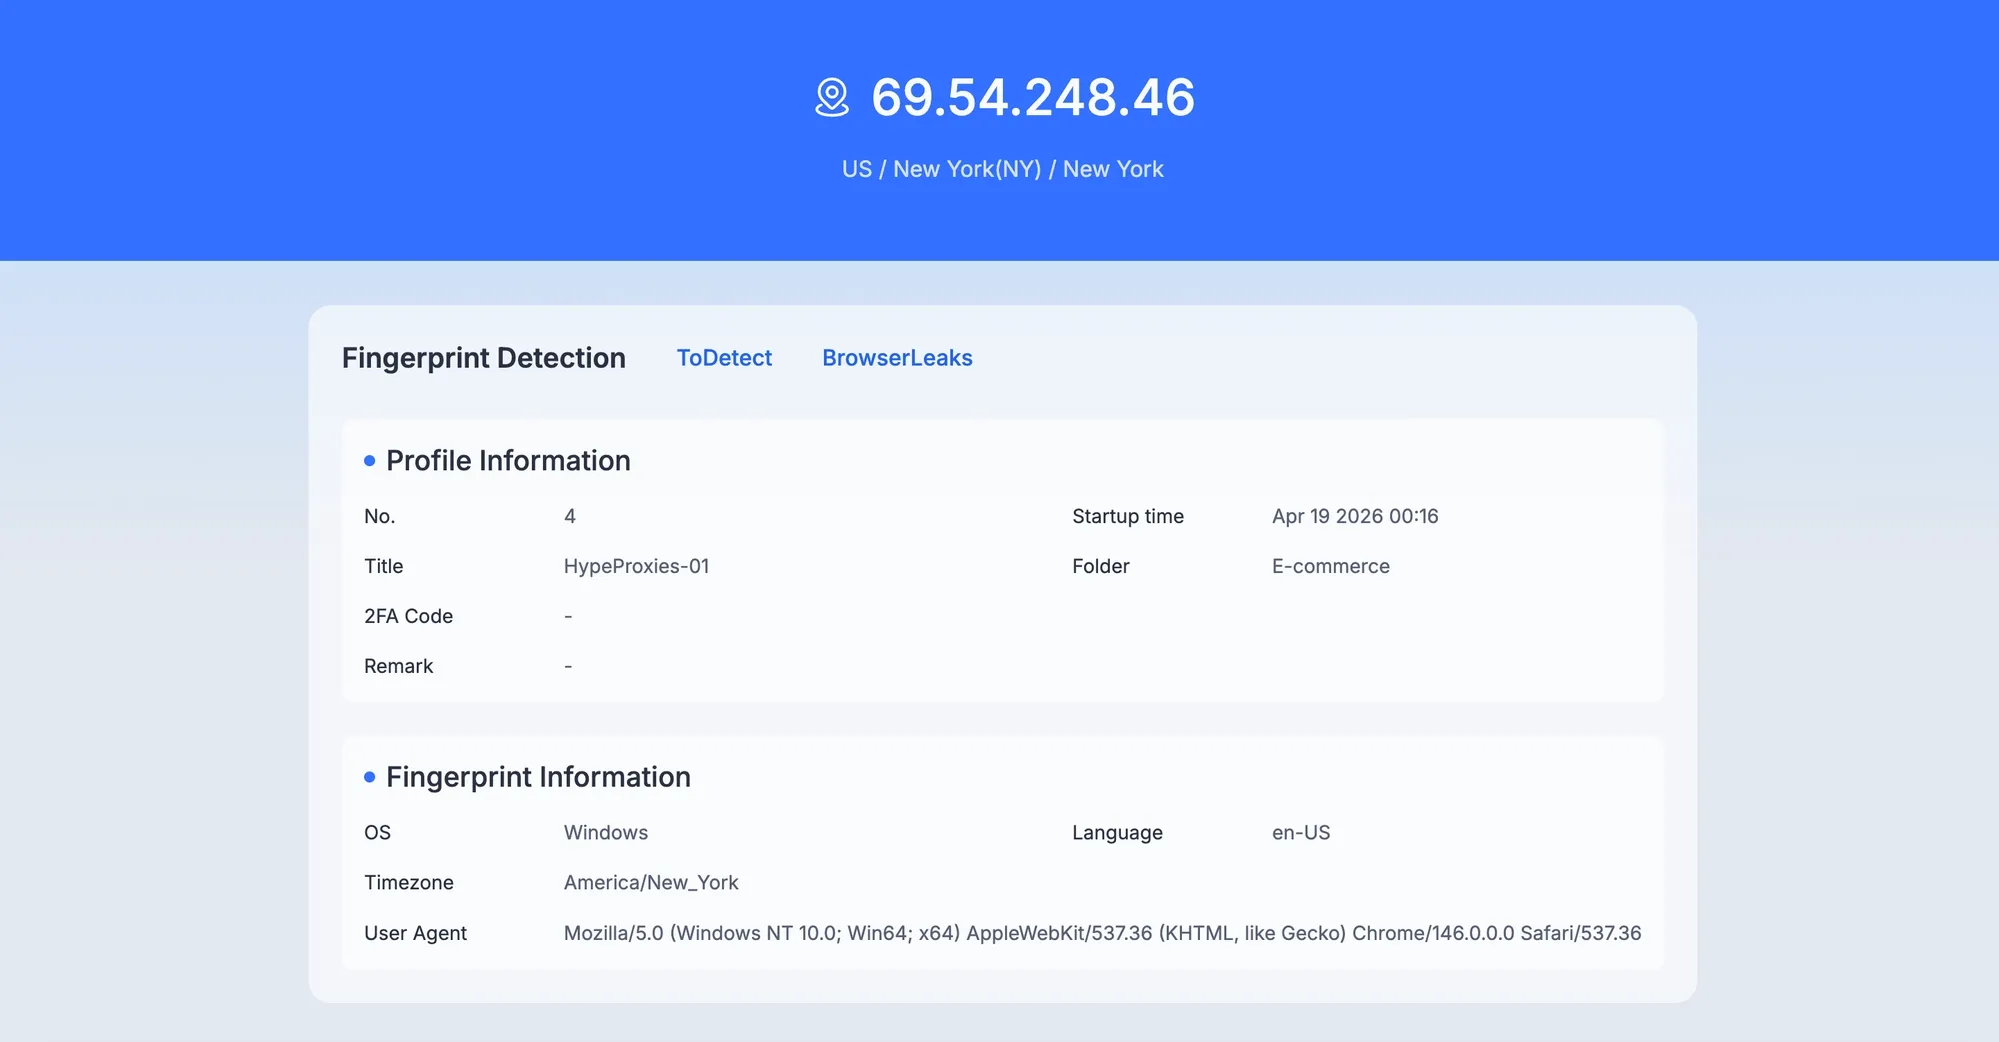
MostLogin browser start page displaying the proxy IP 69.54.248.46, US New York location, en-US language, and America/New_York timezone
Method 2: Batch import multiple proxies
If you have 50 or 100 IPs and each one needs its own profile, adding them one by one is slow. MostLogin has a batch import feature that uploads all proxies at once from a spreadsheet.
Step 1: Prepare the spreadsheet
MostLogin uses an .xlsx template. You will download it from the import dialog in Step 2 (click "Download template").
Template columns:
| * Proxy protocol | * Host | * Port | Account | Password | Rotate URL | * Access | Remark |
|---|
Fields marked with * are required. Fill in the template with your proxy list:
| Proxy protocol | Host | Port | Account | Password | Rotate URL | Access |
|---|---|---|---|---|---|---|
| http | 69.54.248.46 | 59544 | eo****** | CB********** | Me | |
| http | 69.54.250.138 | 58372 | eo****** | CB********** | Me | |
| http | 69.54.250.14 | 65040 | eo****** | CB********** | Me |
- Proxy protocol →
httpfor every row. - Host / Port → Split from
IP:Portin your proxy list. If you have many proxies, use Text to Columns in Excel with a colon delimiter, or theSPLIT()function in Google Sheets to process all lines at the same time. - Account / Password → The username and password from each line of your proxy list.
- Rotate URL → Leave empty (static IPs).
- Access →
Me(only you),Team view(your team can see it), orTeam edit(your team can see and modify it).
You can import up to 1,000 proxies at a time.
Step 2: Open the Proxy Manager
In the left sidebar, click Proxies. Next to the "+ Add proxy" button, click the three-dot icon and select Batch import from the dropdown.
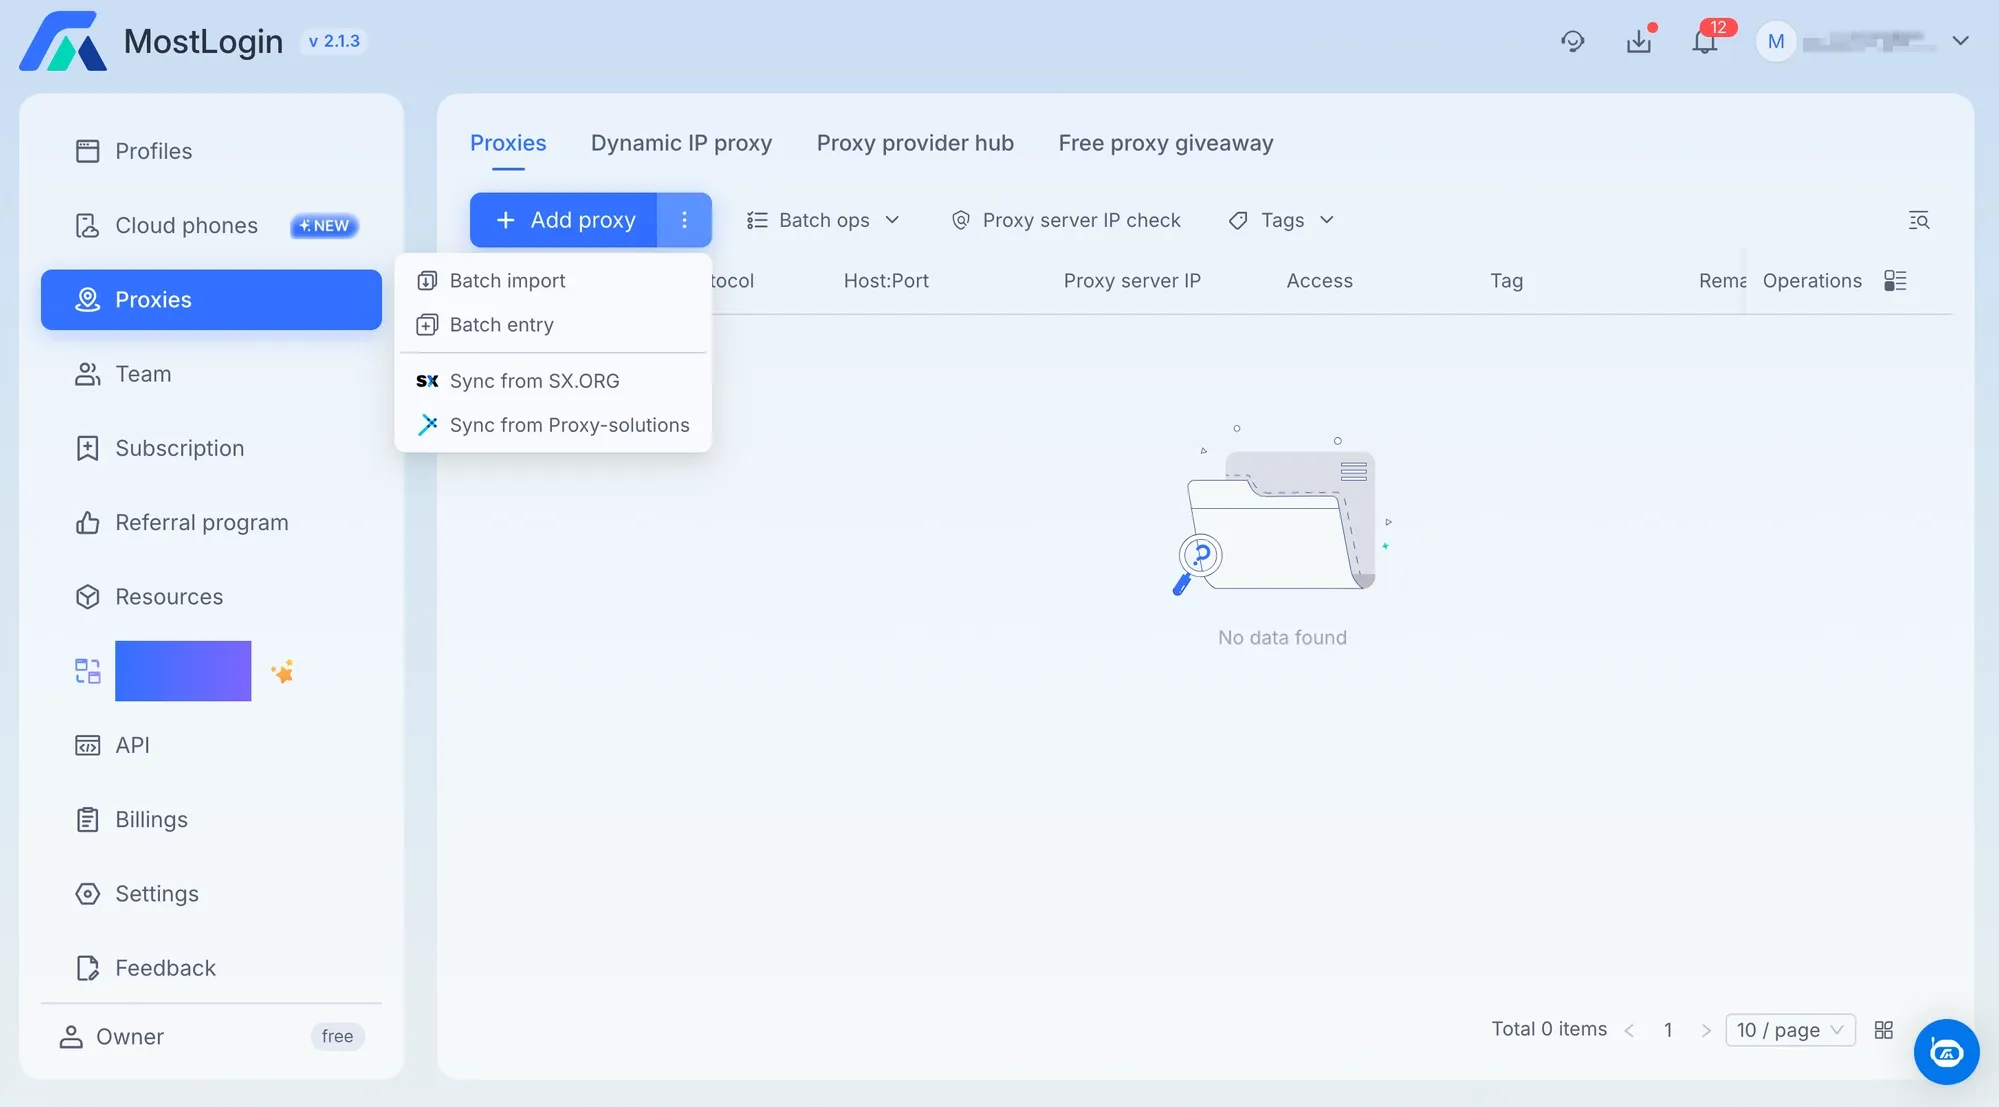
MostLogin Proxy Manager with the three-dot menu open next to the Add proxy button, showing Batch import, Batch entry, and sync options
Step 3: Upload the file
Click the Upload area and select your .xlsx file.
Enable "Skip duplicated proxies" if you are adding proxies to a list that already has entries.
Step 4: Confirm the import
Click Confirm. All proxies appear in the Proxy Manager with their protocol, host:port, and access level.
Use the "Proxy server IP check" button in the toolbar to verify all proxies at once.
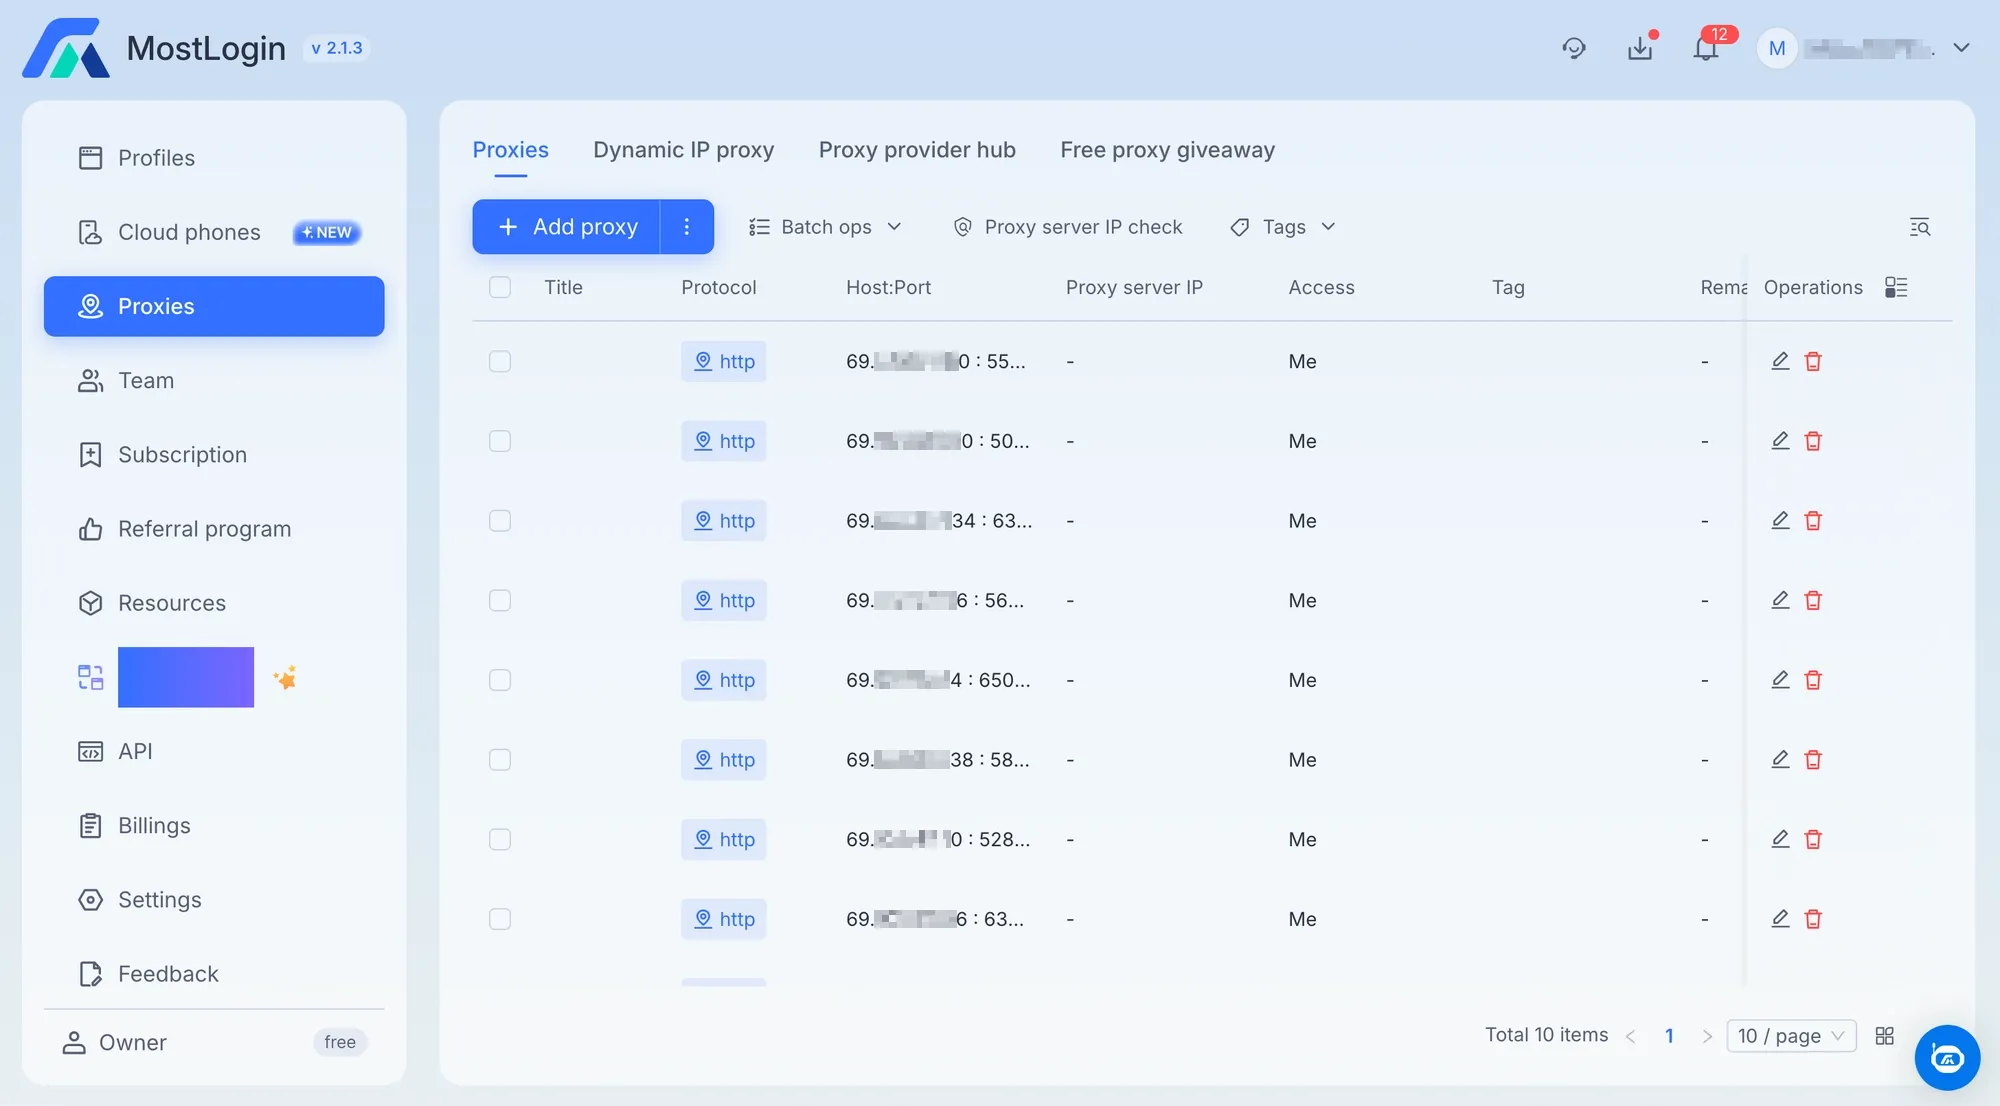
MostLogin Proxy Manager showing 10 imported HypeProxies ISP proxies with http protocol and Me access level
Step 5: Assign proxies to profiles
When you create a new profile, go to the Proxy tab and click "Added proxies". Your imported proxies appear in a searchable dropdown. Select one proxy per profile.
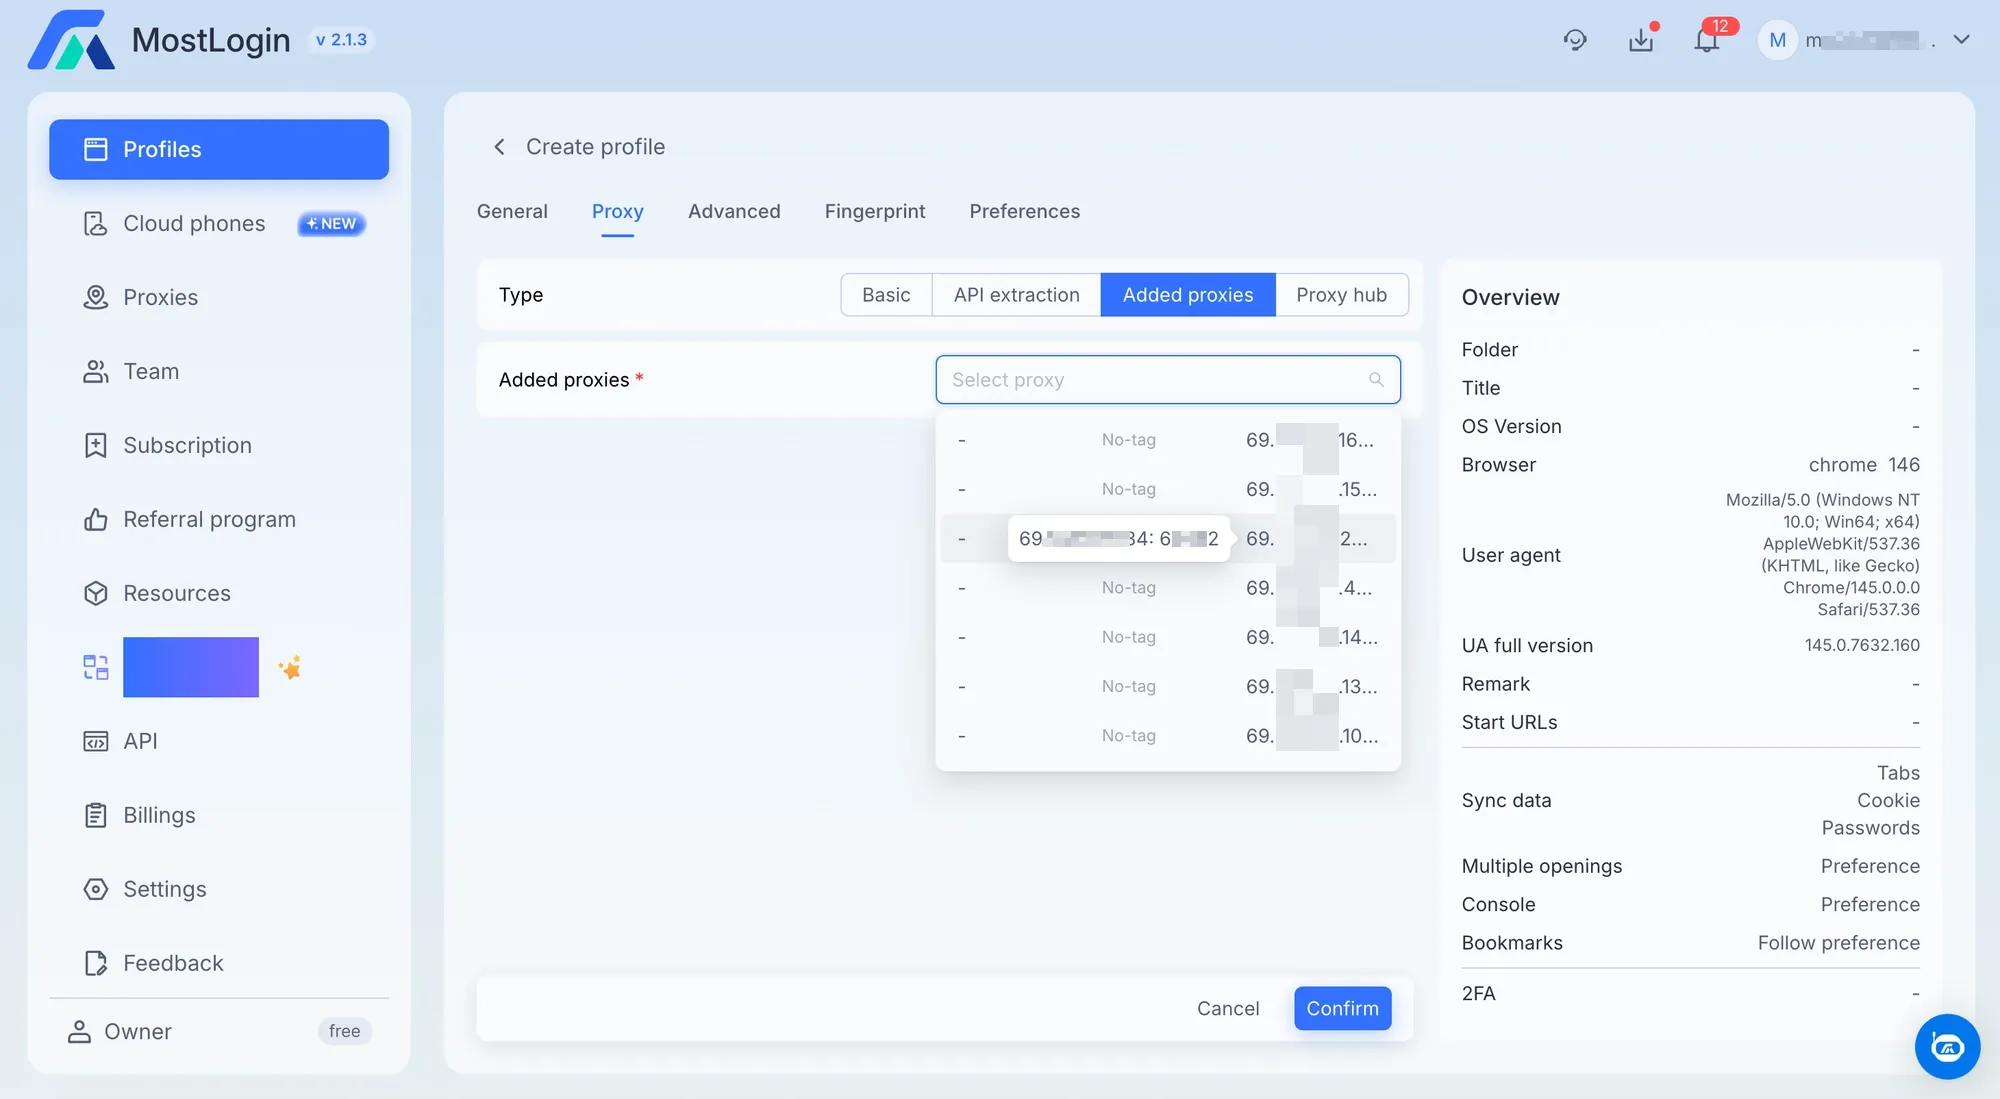
MostLogin Create profile view with Added proxies type selected and a searchable dropdown listing the imported HypeProxies IPs
Use one IP per profile. If two profiles share the same IP, platforms can detect both sessions coming from the same address and flag them as related accounts.
MostLogin API for automation
This section is only relevant if you need to automate profile creation. Skip it otherwise.
MostLogin provides a Local API at http://127.0.0.1:30898 while the desktop app is running. The API works with Selenium, Playwright, and Puppeteer. You can use it to create profiles with proxy assignments and launch browsers programmatically.
You will need an API key from the MostLogin dashboard for authentication. See the MostLogin API documentation for endpoints, authentication details, and code examples.
Troubleshooting
"Proxy authentication failed" or the IP check fails:
- Copy and paste credentials directly from your proxy list. Do not retype them manually. Passwords are case-sensitive and often contain characters that look similar (0 and O, 1 and l).
- Check that the protocol is set to http. Our proxies do not support SOCKS5, which is a common cause of check failures.
- Check if your firewall or antivirus is blocking outgoing connections on non-standard ports.
The IP shown in the browser does not match the one you entered:
- Disable any VPN or network-level proxy on your machine. These can override MostLogin's proxy routing.
- Clear the browser profile's cache in MostLogin and restart the profile.
Profile refuses to launch:
- If "Stop opening on proxy IP change" is enabled in Preferences, MostLogin blocks the launch when it detects a mismatch. Verify the proxy is still active in your HypeProxies dashboard.
Slow page loading:
- Try loading the same page in a regular browser (without MostLogin) to check whether the issue is with the proxy or your internet connection.
- If the regular browser loads pages normally but MostLogin is slow, close any other open profiles. Each profile runs its own Chromium process and consumes memory.
Issue not listed here?
- Contact us on Discord. This is faster than support tickets for real-time issues. You can also open a support ticket with your proxy IP and a description of the problem.